 At the time of writing this post I must say that I feel like a hero! That feeling is wonderful you know, when someone has a problem with their computer and not a simple but a HUGE one and you are able to repair em you turn to be that people hero.
Today my friend Avaco12 made a little mistake while installing bootcamp on her iMac, she left her external (200GB) disk connected, and when Windows asked her where to put the new Partition she accidentally selected her preciousus external drive, when she realized it was already too late, windows had already destroyed the partition table on her disk. She had 1 HFS parition and 1 FAT. She was crying because she said she had her entire life on that disk, so she asked me for help and I started researching what could I possibly do to repair the disk or at least retrieve her data.
 There are plenty of solutions out there, some of them are really expensive, and people on the forums are not very happy with them so I wanted to look at little more into the issue and I came across this solution called TestDisk which is an Open-Source Multi-platform solution for repairing disk partitions. I gave it a try and awesomely I managed to fix the disk using TestDisk and the pdisk utility.
When I called Avaco12 to tell her that I fixed her data she was so happy she couldn’t stop smiling she told me I was her Hero and so that’s how I felt, the process wasn’t easy specially because noone talks about how pdisk works on Mac OS X.
Here’s how I did it , hope it works for you.
1.- I downloaded TestDisk from their official site :http://www.cgsecurity.org/wiki/TestDisk
2.- I opened the terminal and surfed to where I downloaded and unziped TestDisk
3.- I issued the command ‘sudo ./testdisk’ it indetially promped me to make my terminal bigger =P, after doing so It displayed me a simple disclaimer and then a notice telling me that TestDisk could Log all the activity if I wanted to. I selected Yes and continued.
4.- On the screen it will display you all the Disk it detects connected to your Mac select the one that got damaged partition tables and press Enter. Take note of which drive you selected, in my case I chosed /dev/rdisk1 (rather than /dev/disk1)
5.- Next screen select the menu Analize, it will probbly display you and error telling you the block 0 couldn’t be read, just hit enter on the ‘Quick Analize’ option
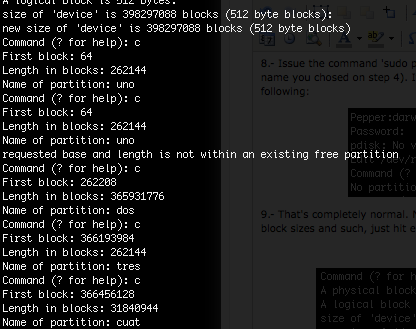
6.- ATTENTION: TestDisk will quickly search for partitions on the disk and display you information about it on your disk. Take note of the information it will display you, since you’ll need it to repair the disk later on with pdisk.
Here’s a screenshot of what I got:
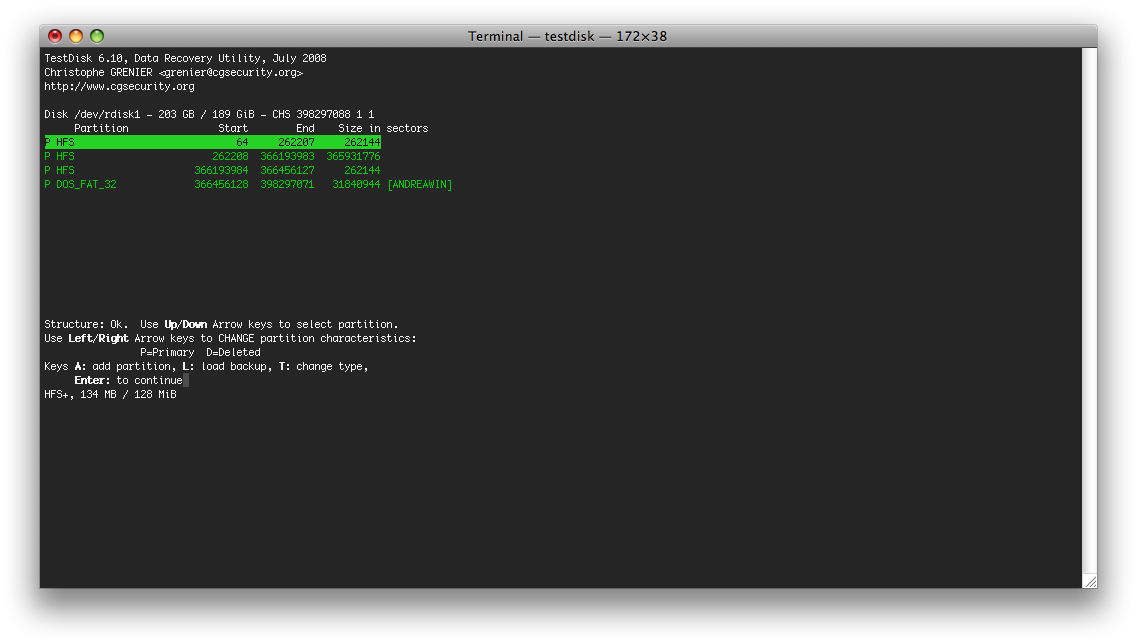
Note: if you try to repair your partition table with TestDisk it will fail since that function is not yet implemented.
7.- you can now exit TestDisk. The next steps are what distinguish a child from a Men
8.- Issue the command ‘sudo pdisk /dev/rdisk1’ (where /dev/rdisk1 should be the same name you chosed on step 4). If you type the command ‘c’ and hit enter it will tell you the following:
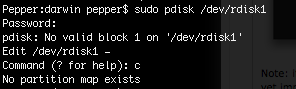
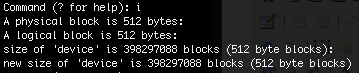
9.- That’s completely normal. Now type ‘i’ and it will display you some affirmations about block sizes and such, just hit enter:
10.- Now we are going to need the info from Step 6. type the command ‘c’ and press enter, it will ask you to type down where your first partition starts, how long it is and how you want to name it. repeat this step for every partition you have.
11. Now if you are completely sure you wrote down everything correctly (like I did) just type down ‘w’ and hit Enter, It will prompt you to confirm just say yes (y)
12. type ‘q’ to quit the application and go see for yourself if your disk appears now in Finder. If it does, go to Step 13. else try disconnecting your external hard disk and reconnecting it. After Mac OS X 10.6.7 it is suggested that you restart your machine and reconnect the disk. If this fails try again from step one. Don’t worry about rewriting the partition table it doesn’t harm your data.
13. You are a hero, no matter if it’s your own disk, you just saved your data!
UPDATE:
If you are having problems with an error message on pdisk saying “the map is not big enough” follow these steps:
Before the analyze step go to GEOMETRY and change the sector size according to the following table:
| Volume Size |
Default Block Size |
| <=256 MB |
512 bytes |
| 256 MB <= 512 MB |
1024 bytes |
| 512 MB – 1 GB |
4096 bytes |
Now go back to the ANALYZE step continue from there. Thanks to Stan Alien for the heads up.
Congratulations, and I hope this information is usefull to you now remember to backup your data! Personally I recommend Backblaze.
You can buy me a drink if you’d like to share your joy 🙂
cheers !
 Often while I’m administrating a Linux/Unix box I come across the tediousus task of freeing up space on the server, usually this task is easily accomplished by issuing a simple “ls -lh” command, you get a nice listing of the files in the current directly along with some nifty details like last modification date and size (the -h parameter for ls allows us to get the size in a human-readable way).
 I don’t want to sound mean but, God, MSDN API sucks =P. Not because it doesn’t tell you the stuff you need to know but because it requires alot of imagination from you to understand it.
 That was a long title for this post o_o. Well , I first must clarify that my blog is not a wordpress mod, however it doesn’t mean I don’t have to work with wordpress at some point in the day. Recently I was doing a newsletter for a Website and I decided I would parse the RSS from that website to get the 4 newest contents however I ran into a trouble while using PHP’s SimpleXML class and this was that I SimpleXML couldn’t parse the contentn since it came with what is called namespace. For those of you who only came in here for the solution here it is =)
 Today I had a hard time creating a regexp to match domains on a string. I wouldn’t like the internauts who visit this small blog to suffer the same pain, so here’s how to :