Como crear un contenedor Docker de Ruby

Si desarrollan en Ruby pueden contenerizar su código bastante fácil, en este ejemplo utilizo Sinatra como framework pero pueden cambiarlo por el framework de su preferencia.  Código en Github al final
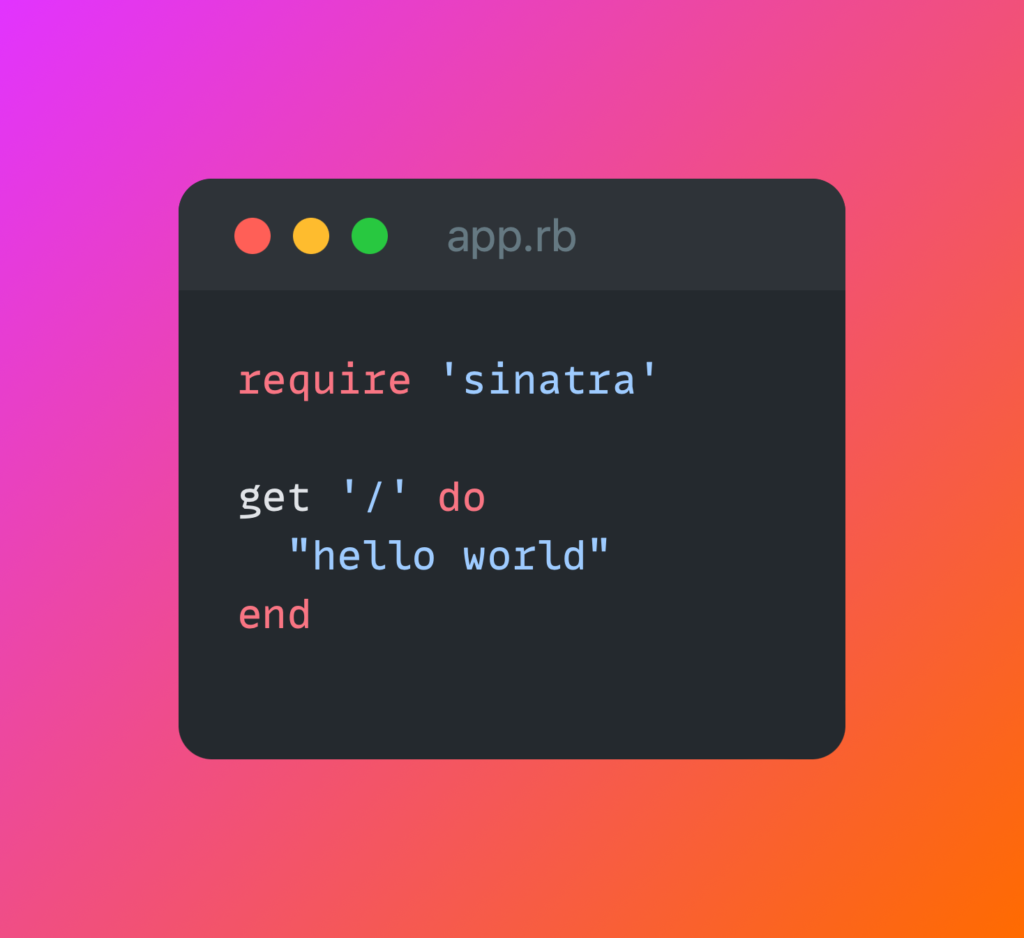
Ojo que el puerto 4567 es default de Postgres, si tienes un postgres corriendo localmente vas a necesitar apagarlo o cambiar el puerto de al app

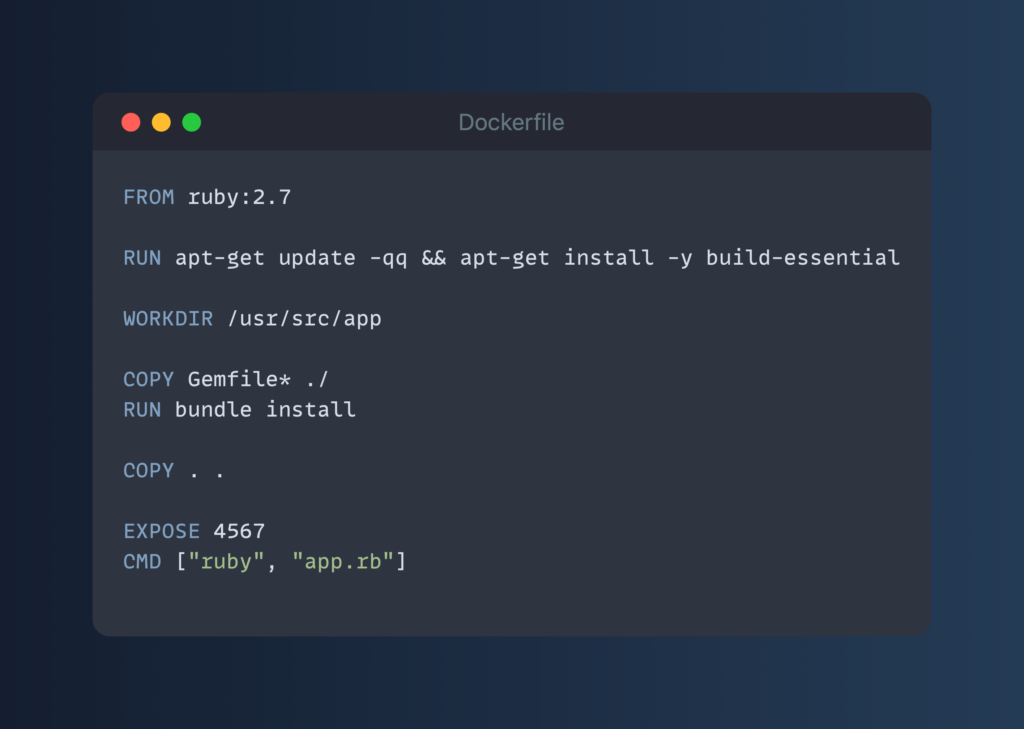
Para crear una image de docker para esta aplicación tiene que crear un `Dockerfile` que arranque con la imagen de `ruby:2.7`, asi ya no tienen que instalar nada ustedes, si necesitan otra version de Ruby, digamos la 2.6, solo cambian esta linea a `ruby:2.6` y listo, PERO RECUERDEN QUE RUBY 2.6 TUVO END OF LINE EN DICIEMBRE DEL 2018 YA NO LO USEN POR AMOR A DIOS.

Primero vamos a copiar el `Gemfile` e instalarlo con `bundle install` dentro del contenedor para tener todas nuestra dependencias listas

Segundo vamos a copiar todo el codigo a un folder `/usr/src/app` 

Finalmente declaramos que puerto expone este contenedor (4567) y el comando para arrancar el servidor, un simple `ruby app.rb`
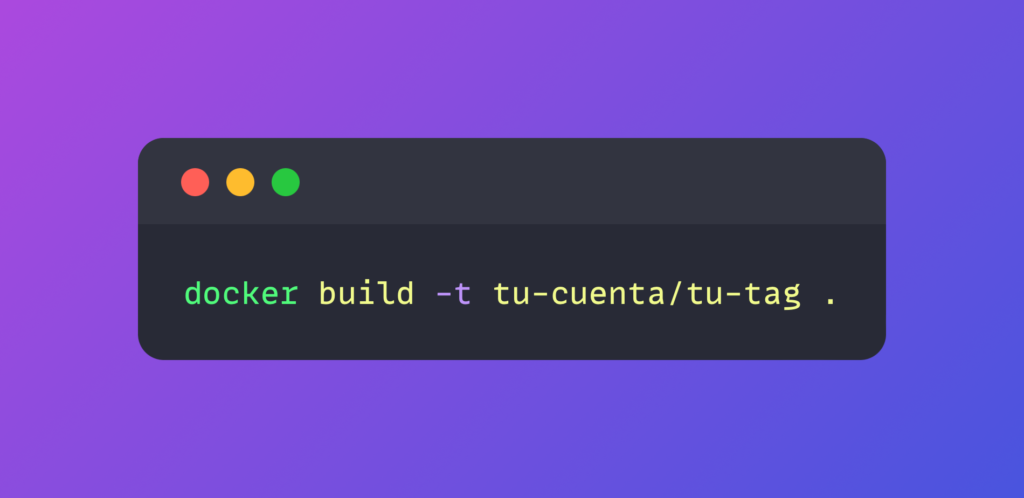
Para construir esta image de docker, solo tienen que correr el siguiente comando en el mismo folder donde esta su proyecto y su Dockerfile
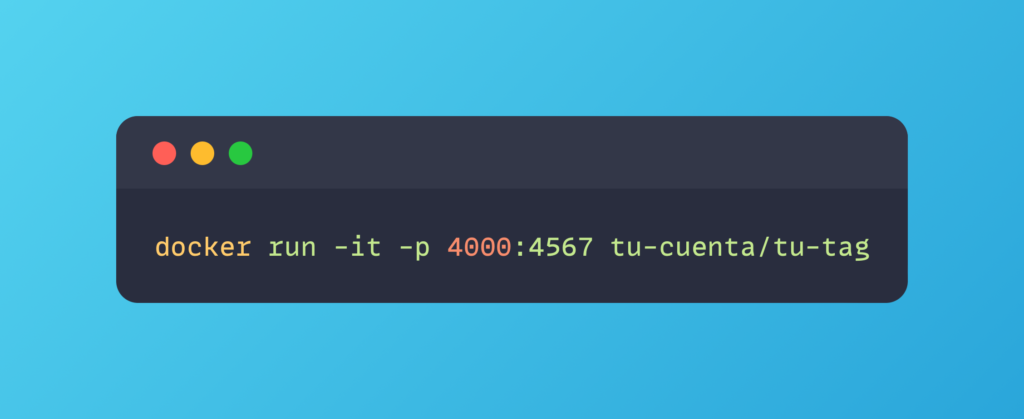
Ya con esto pueden probar su image de docker localmente, aqui la vamos a correr y re-mapear el puerto de la aplicación `4567` a otro puerto en mi host que esta disponible `4000`. Visiten http://localhost:4000 y vean el resultado
Si están trabajando en una Mac con Apple Silicon, pueden crear imágenes de docker multi-arquitectura para que las computadoras con procesadores x86 también puedan correr la imagen

Ahora cuando quieran deployear en producción puede usar esta imagen, ya no mas copiar archivos por FTP o en ZIP.  Eventualmente queremos deployear esto en #Kubernetes  

Todo el codigo esta en https://github.com/perrohunter/docker-ruby

How to use letsencrypt certificates in Jupyter and IPython

jupyter-sq-textSo I got into the letsencrypt-everything-train using letsencrypt. It’s really nice being able to add SSL to all my private and public domains, gives me the illusion of security, anyway, you are most likely here to know how to add your letsencrypt certificates to your iPython or Jupyter setup.

If you already have your letsencrypt certificate skip to step 3.

1. Clone letsencrypt from github

sudo git clone https://github.com/letsencrypt/letsencrypt /opt/letsencrypt
sudo cd /opt/letsencrypt

Copy the generated certificates to a location your notebook server can access

2. generate a certificate for your domain, I love this one liner

./letsencrypt-auto certonly --standalone --email hi@perrohunter.com -d a.4ph.in

3. On your iPython/Jupyter configuration file you’d need to add the following lines

c.NotebookApp.certfile = u'/your/cert/path/cert.pem'
c.NotebookApp.keyfile = u'/your/cert/path/privkey.pem'

Start your notebook server and voila.

Hope this is useful to you.

Fix “IOError: Not a gzipped file” In TensorFlow Docker Example

TensorFlow_logoIf you are learning TensorFlow there’s a lot of nice options that the TensorFlow tutorial site propose, one of them is the one of using Docker Containers, however I found that while trying to follow through the MNIST example notebook I was getting error:

IOError: Not a gzipped file

This is caused because the notebook attempts to download the MNIST data set from the original site, for whatever reason the downloads are not working but if you try it from a regular browser you’ll be able to download the files however.

So to fix this problem what I did is the following:

1.- Delete the existing files inside the docker container

docker exec rm /tmp/mnist-data/*

2.- Download all the files to your local system:

curl -O http://yann.lecun.com/exdb/mnist/train-images-idx3-ubyte.gz
curl -O http://yann.lecun.com/exdb/mnist/train-labels-idx1-ubyte.gz
curl -O http://yann.lecun.com/exdb/mnist/t10k-images-idx3-ubyte.gz
curl -O http://yann.lecun.com/exdb/mnist/t10k-labels-idx1-ubyte.gz


3.- get your docker container ID

docker ps

output:

CONTAINER ID        IMAGE                            COMMAND                  CREATED             STATUS              PORTS                              NAMES

79110284079c        b.gcr.io/tensorflow/tensorflow   “/run_jupyter.sh”        44 minutes ago      Up 44 minutes       6006/tcp, 0.0.0.0:8888->8888/tcp   clever_bhaskara

4.- copy the files from your local folder into your docker container in the /tmp/mnist-data folder

docker cp train-images-idx3-ubyte.gz 79110284079c:/tmp/mnist-data
docker cp train-labels-idx1-ubyte.gz 79110284079c:/tmp/mnist-data
docker cp t10k-images-idx3-ubyte.gz 79110284079c:/tmp/mnist-data
docker cp t10k-labels-idx1-ubyte.gz 79110284079c:/tmp/mnist-data

That should do the trick, keep following the notebook lesson.

Happy Learning.

How to compile Apache Zeppelin with Spark 1.6

zeppelinhqdefaultRecently I found Apache Zeppelin, an Apache Incubator project that seems to bring a new paradox into the data science game, and other areas.

Something I’ve really like about Zeppelin is the ease of interaction with spark, I use the spark-shell all the time, but it’s tedious having to re-evaluate commands that I previously inputted, Zeppelin fixes this problem. It let’s me go back and forth across the script that I’m building on spark which is nice.

At time of writing the latest release of Zeppelin is 0.5.6, which comes bundled with Spark 1.4.1 but for reasons I want to use Spark 1.6 so in order to build Zeppelin with Spark 1.6 you are going to have to build it from the source.

1.- Download the latest stable source code from Zeppelin’s download page:

https://zeppelin.incubator.apache.org/download.html

2.- untar

tar -zxvf zeppelin-0.5.6-incubating.tgz

3.- compile with support for spark 1.6

mvn clean package -Pspark-1.6 -Dspark.version=1.6.0 -Dhadoop.version=2.6.0-cdh5.4.8 -Phadoop-2.6 -Pyarn -Ppyspark -Pvendor-repo -DskipTests

For more information on what other parameters you can tweak, checkout Zepellin’s Readme file

Coda 2 Plugin to autocomplete Angular

coda-iconI love the new Coda 2.5, it has great improvements over the first release of Coda 2 however there is one huge thing that it’s missing and that is more Angular integration.

I think it’d be great if we could have bot syntax and code competition that fits our Angular needs.

So….. I wrote a small plugin that autocompletes the basic angular functions and services, it’s not much but it can get you started, please leave some feedback regarding what do you think I could improve or feel free to collaborate on GitHub.

Downolad from GitHub

org.hibernate.HibernateException: /hibernate.cfg.xml not found in IntelliJ Project

hibernate_logo_aWhile working on a project on IntelliJ I added Hibernate, everything looked great since IntelliJ Idea 13 added the libraries and even allowed me import a schema until I hit run, then I stumble across this problem:

“org.hibernate.HibernateException: /hibernate.cfg.xml not found”

Like, “WHAT?” Wasn’t IntelliJ supposued to configure everything for me? Well, it configured everything up to a nice point but this error was a show stopper, the solution is quite simple and that is to move the hibernate.cfg.xml file to your WEB-INF/classes directory

To fixed I had to do the following.

In your project, in the WEB-INF directory, create a classes folder if it already doesn’t exist.

Look for hibernate.cfg.xml in your Project, it’s usually located at Project > src > main > java and copy it to Project > src > main > webapp > WEB-INF > classes

Hit Run and that’s it.

How to delete de DefaultDomain of an Integrated Application Server for Weblogic on OS X

weblogicWow, this has a really long post title.

Basically what I just figured out is how to delete the default domain that is created by the integrated Application Server (weblogic) by Jdeveloper.

Open Terminal.app

cd  ~/.jdeveloper/

Here you’ll find various folders, go into the one that resembles systemjdevversion for example

cd system12.1.2.0.40.66.68

then delete folder DefaultDomain

rm -Rf DefaultDomain

After this just restart jdeveloper and you can create a default domain again.

True meaning of blog

It’s been a while since I’ve added a post to my blog, I though I’d just add this quick note just to add the feel of new post to the main page.

When I decided to start a blog I realized that I could simply share with the world what I learn, of course not everything I learn, but the things that I learn that google couldn’t solve with a simple search, most knowledge is arcane, if you could see my notes you’d be surprised how much tweaks and work arounds I figure. For this 2014 I’ll try to share more of my findings on this website.

Hope something is reading out there.

Huh, the internet, such majestic creature.

Search for a song and play it with Alfred 2.0 for free

logoAlfred 2.0 just came out and personally I found it’s an amazing app, I’m still a huge fan of Butler but let’s face it, Manytricks hasn’t updated the software in a very long time and the users (at least me) are hungry for new features.

Alfred 2.0 delivers a lot of fetures, among them the chance to create your own workflows with many scripting languages likes bash, php and ruby among others.

So I had the need of searching a song in my iTunes library, that simple right? no! while Butler did that just out of the box, with Alfred 2.0 you need to buy the PowerPack which is 15 pounds (around $20 dollars) and still, when you look for a song using the mini-player, which you have to activate with a different set of keys or commands, the song you played will play once and then plain silence will be heard, that kinds of anoys me as I’m always expecting the music to keep player.

To solve this issue I made a really simple and fast workflow that allows you to look for songs on your iTunes Library, I don’t know if it could work without the power pack so I’ll post both, the one I’m sure that works with the powerpack of Alfred and the slower version that works with iTunes and applescript.

Hope it’s useful to you.

iTunes Search and Play (to use with PowerPack)

iTunes Search and Play (to use without powerpack)

Scheduling jobs on Oracle Apex

So I’m working with apex to get some things done and I think it’s a nice tool, it already has everything in it so you can create quick reports and other fancy web tools so I designed a report on PL/SQL and I had the need to have it run daily, after finding out how I thought you might find useful this snippets of code.

We use the dbms_scheduler.create_job() API to easily add jobs to APEX’s scheduler:

BEGIN
dbms_scheduler.create_job(
     job_name => 'JOB_NAME',
     job_type => 'STORED_PROCEDURE',
     job_action => 'procedureName',
     start_date => '04-JUL-12 07.00.00.000000 AM -05:00',
     repeat_interval => 'FREQ=DAILY',
     enabled => TRUE,
     comments => 'My super report, dont delete.');
END;

To check for existing jobs on the scheduler we can query the user_scheduler_jobs table;

SELECT * FROM user_scheduler_jobs;

And lastly and just as useful, to delete a job from the scheduler we use the dbms_scheduler.drop_job() API call:

BEGIN
dbms_scheduler.drop_job(
     job_name => 'JOB_NAME');
END;

Hope you guys on the internetz find this useful.